Extending NESTML
The NESTML toolchain is lightweight, modular and extensible.
Internal workflow
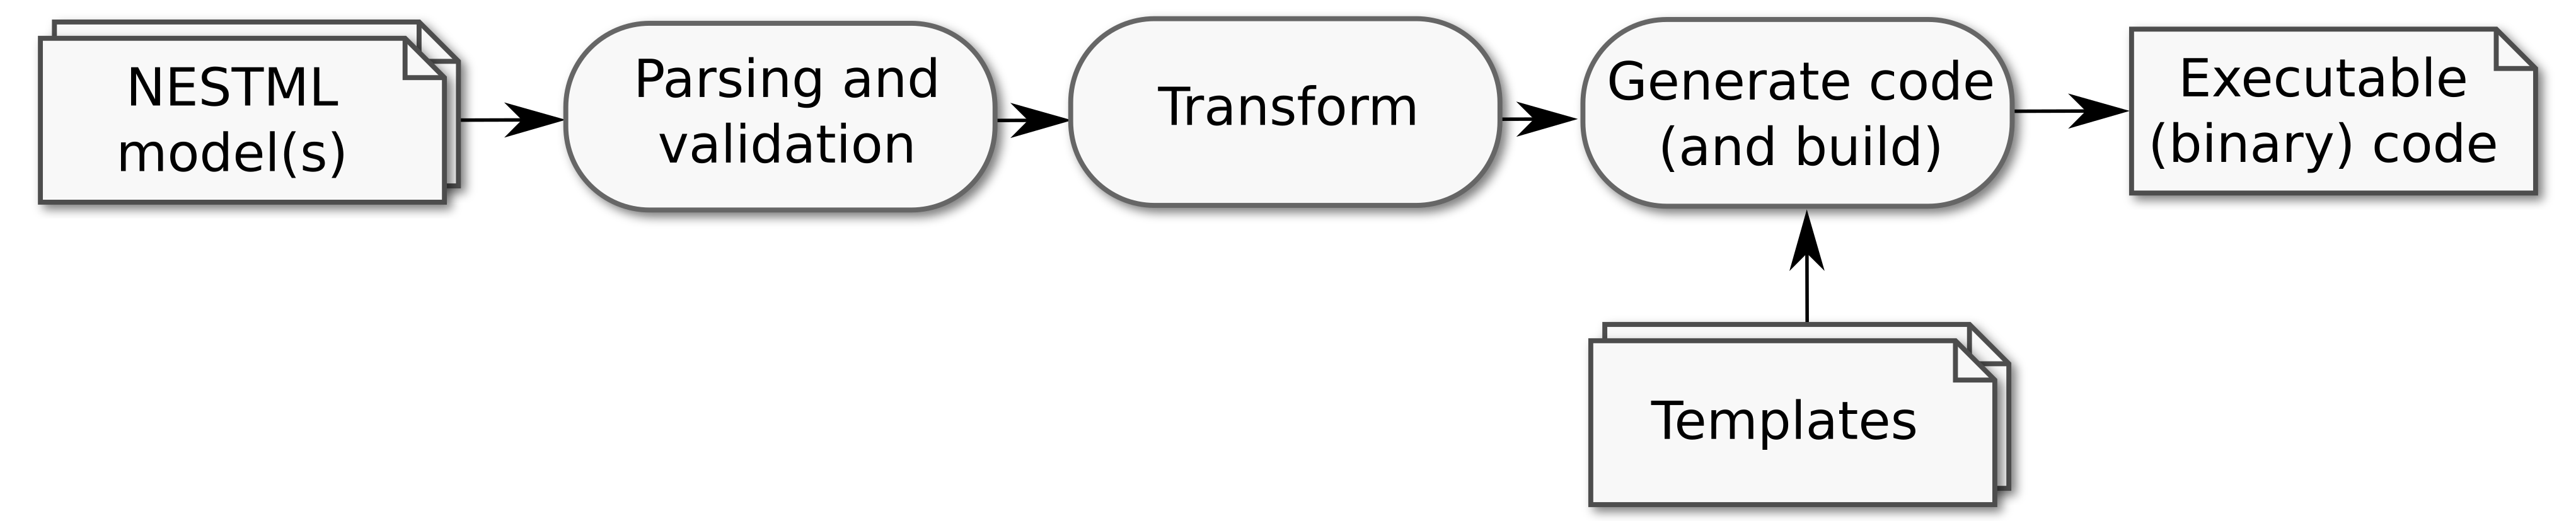
When NESTML is invoked, several steps are executed in sequence. First, the model(s) are parsed and validated. Then, depending on which target platform has been selected, transformations may occur, such as variable name rewriting in case of conflict with a keyword in the target language). The transformed models are then passed to the code generator, which combines them with a set of templates. Finally, an optional build stage compiles and builds the code, for example to yield a dynamically loadable library (.so or .dll file).
A more detailed description of the internal architecture of NESTML can be found in the following places:
Tammo Ippen, “NESTML - Creating a Neuron Modeling Language and Generating Efficient Code for the NEST Simulator with MontiCore”. Master’s thesis, RWTH Aachen University (2013)
PDFKonstantin Perun, “Reengineering of NestML with Python”. Master’s thesis, RWTH Aachen University (2018)
PDFDimitri Plotnikov, “NESTML - die Domänenspezifische Sprache für den NEST-Simulator Neuronaler Netzwerke im Human Brain Project”. Doctoral thesis, RWTH Aachen University (2017)
PDFA condensed online English version is available: PyNESTML - NESTML Toolchain in Python
API documentation
API documentation is automatically generated from source code and can be browsed here: pynestml module index
Running NESTML with custom templates
NESTML generates model-specific code using a set of Jinja templates. The templates for each target platform are located in the pynestml/codegeneration/resources_* subdirectories. (For more information on code generation using templates, see Section 3.1: AST Transformations and Code Generation.) For example, for NEST, NESTML by default uses the templates in the directory pynestml/codegeneration/resources_nest/point_neuron. These defaults are specified in the code generator within its default values dictionary (_default_options, see for instance https://github.com/nest/nestml/blob/main/pynestml/codegeneration/nest_code_generator.py).
The default directory can be changed by specifying code generator options that override the default values. This can be done either by passing these options via the codegen_opts parameter of the NESTML Python API call to generate_target(), or on the command line, through the --codegen_opts parameter to a JSON file. For example:
nestml --input_path models/neurons/iaf_psc_exp_neuron.nestml --codegen_opts /home/nest/work/codegen_options.json
An example codegen_options.json file for NEST could look as follows:
{
     "templates":
     {
         "path": "/home/nest/work/custom_templates",
         "model_templates": {
             "neuron": ["@NEURON_NAME@.cpp.jinja2", "@NEURON_NAME@.h.jinja2"],
             "synapse": ["@SYNAPSE_NAME@.h.jinja2"]
         },
         "module_templates": ["setup/CMakeLists.txt.jinja2",
                              "setup/@MODULE_NAME@.h.jinja2","setup/@MODULE_NAME@.cpp.jinja2"]
     }
}
The templates option in the JSON file contains information on the custom Jinja templates to be used for code generation.
The
pathoption indicates the root directory of the custom Jinja templates.The
model_templatesoption indicates the names of the Jinja templates for neuron and synapse model(s) or relative path to a directory containing the neuron and synapse model(s) templates.The
module_templatesoption indicates the names or relative path to a directory containing the Jinja templates for the module.
The escape sequence @NEURON_NAME@ (resp. @SYNAPSE_NAME@, @MODULE_NAME@) will be replaced with the name of the neuron model (resp. synapse model or name of the module) during code generation.
If a directory is given, the directory is recursively searched for templates (files ending in the .jinja2 extension), for example:
codegen_opts = {"templates": {"module_templates": ["setup"]}}
Adding a new target platform
Add a new set of templates in a new directory under pynestml/codegeneration/resources_*.
Implement a new code generator, for example based on the existing nest_code_generator.py.
Optionally, implement a new builder, for example based on the existing nest_builder.py.
Add the new target platform to the frontend in pynestml_frontend.py.